Saturday, September 19, 2015

Drying Kale and Spinach


Never even thought of drying kale or spinach until reading posts from Oh Lardy and Self-Reliant School. What a great idea! Certainly was easy enough to do.

First thing I did was wash the leaves up good. I filled the sink with water and added some dish soap and vinegar to kill any bugs or worms. I admit that there were several worms and because of this, I made sure to check each leaf, front and back!


After checking each leaf thoroughly, I placed them in a bowl of clean water to rinse. Once rinsed, I drained them in a colander.


Then the leaves were transferred onto a clean, dry towel to drip even more.


Because I was drying a large quantity of both kale and spinach, I put the spinach in a couple cake pans and placed them in the oven at 150 degrees for 3 hours.


I placed all the kale on the dehydrator racks to dry.


Once the leaves had dehydrated considerably and shrunk in size, I transferred the kale to the lower racks and added the spinach to the upper racks.


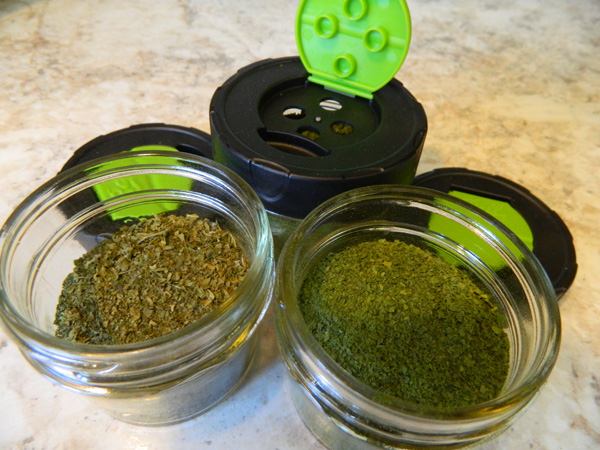
After the leaves were thoroughly dried, I removed any hard stems and put them in my blender to grind into a powder. Then I put them in small jars.

I am simply amazed at how my large bags of leaves turned into two small jars of kale powder and one small jar of spinach powder! Guess you could call this "down-sizing". Ha!


Disclosure: The Excalibur Dehydrator link under "Other Sites" is an affiliated link. If you make a purchase using this link ~ you will receive free shipping, along with other specials. I also earn a small percentage to help support my blog. Thank you, your support is appreciated!!

Sunday, September 13, 2015

Gluten Free Black Bean Brownies


These are so very easy to make and really tasty, too! And the best part is they're gluten free!!

Gluten Free Black Bean Brownies

15-oz. can black beans, rinsed and drained
1/2 c. gluten free old fashioned rolled oats
1/2 c. miniature chocolate chips
2 T. cocoa powder
2 T. sugar
1/2 t. baking powder
1/4 t. sea salt
1/3 c. honey
1/4 c. coconut oil
2 t. vanilla

Place the rolled oats in a food processor and pulse until oats are a coarse flour. Add remaining ingredients and process until mostly smooth. Pour into an 8"x8" greased pan and bake in preheated oven at 350 degrees for 15-18 minutes. (I took mine out after 16 minutes and it was perfect!)

This is my version of the brownies found on Chocolate Covered Katie.


Disclosure: The Excalibur Dehydrator link under "Other Sites" is an affiliated link. If you make a purchase using this link ~ you will receive free shipping, along with other specials. I also earn a small percentage to help support my blog. Thank you, your support is appreciated!!

Fermented Pickles


Since I received several cucumbers and had a few leftover zucchini from a co-worker, I decided to try my hand at making some homemade pickles. Seemed simple enough.

After all the produce was washed, I pulled out my vegetable slicer and my #1 indispensable kraut making tool, and began slicing up all the cucumbers.


Since I had the tools out already, I went ahead and sliced up the zucchini, too. Then I used my #2 indispensable tool and placed all the sliced cucumbers into a large jar.


Once all the cucumbers were in the jar, I found there was still plenty of room so I added the zucchini on top.


I measured the spices and sprinkled them on top of the pickles, then I added the liquid to make a brine making sure to cover all the sliced cucumbers and zucchini. I placed a plastic lid that I had cut down in size on top to hold the pickles under the brine. I put the cover on and left the jar on the counter where it will sit for a couple weeks before going into the refrigerator.


I based the directions and recipes for the brine off the ones I found at Living Life Real and Mother Earth News

Fermented Pickles:

Cucumbers, sliced
2 T. dill weed
2 t. minced garlic
2 T. celtic sea salt
1 T. apple cider vinegar
1 t. turmeric
8 c. water

Slice the cucumbers and put in a large jar. Add the spices and the apple cider vinegar. Add water to fill the jar. Cut a piece of plastic to hold the cucumber under the brine. Cover and ferment at room temperature for two or more weeks. Taste pickles regularly. When fermented pickles reach a flavor you like, refrigerate them. Should last 4 to 6 months.


Disclosure: The Excalibur Dehydrator link under "Other Sites" is an affiliated link. If you make a purchase using this link ~ you will receive free shipping, along with other specials. I also earn a small percentage to help support my blog. Thank you, your support is appreciated!!

Monday, September 7, 2015

3 Indispensable Sauerkraut Tools!


How did I ever get along without this glove?! Remember when I nearly sliced the tip of my finger off making Cabbage Into Kraut? Well now I don't have to worry about that anymore since I picked up this fillet glove used for cleaning fish!


Because I suffered for a few weeks from this minor injury, this glove is the #1 indispensable tool for making my fermented foods. I use it for shredding and slicing anything and everything, and it works like a charm!

The #2 tool I love is this collapsible funnel. Before I bought this I made the biggest mess trying to stuff cabbage into the jar. Now the only mess is inside the funnel, not all over the outside of the jar.


And the #3 indispensable tool I recently purchased is a couple of the Perfect Pickler fermenting tools. It makes kraut making easy!


I wish I would have purchased these three tools before making my first batch of sauerkraut.

Below is a photo of the Perfect Pickler in action. As you can see, it fits any wide mouth size canning jars.


Since the photo was taken several weeks ago, I am enjoying this sauerkraut and will be making more throughout the year now that I have all the right tools!


Disclosure: The Excalibur Dehydrator link under "Other Sites" is an affiliated link. If you make a purchase using this link ~ you will receive free shipping, along with other specials. I also earn a small percentage to help support my blog. Thank you, your support is appreciated!!

Hummingbird Photos


One of my favorite things to do is to sit on our front porch and watch the hummingbirds flying back and forth to fight over the feeders. I was so thrilled to get several close up shots of these frisky little birds and wanted to share them with you. Hope you enjoy them as much as I do!


Disclosure: The Excalibur Dehydrator link under "Other Sites" is an affiliated link. If you make a purchase using this link ~ you will receive free shipping, along with other specials. I also earn a small percentage to help support my blog. Thank you, your support is appreciated!!

Sunday, September 6, 2015

Down Home On The Farm


While washing up the supper dishes one evening, I happened to glance out the bay window over the kitchen sink to a beautiful view of the barn. The colors were all so vibrant that I just had to run grab my camera and head out for a photo to capture the moment. It was so peaceful and still, and the red, green and blue colors all stood out so crystal clear. Yup, a beautiful evening to appreciate down home on the farm.


Disclosure: The Excalibur Dehydrator link under "Other Sites" is an affiliated link. If you make a purchase using this link ~ you will receive free shipping, along with other specials. I also earn a small percentage to help support my blog. Thank you, your support is appreciated!!

Saturday, September 5, 2015

Landi Raemi's Ultimate Fudge Stuffed Cookies!!


Oh my goodness!!! Have I got a treat for you!

It all started when my son Peter tried the new Dairy Queen fudge stuffed cookie treat and gave us each a taste of it. Let me tell you, they are fantastic!! We've been back for more a few times, but they are a bit spendy so we usually share one.

Now we don't have to share because after a few tries, I finally perfected these fudge stuffed chocolate chip cookies and they are great! You're going to love them, too!!

The cookie dough batter was the creamiest I've ever had and we ate our fair share of that, too!!


After whipping up the cookie dough, I dropped them onto a cookie sheet and baked them at 375 degrees for 10-11 minutes.


When I took them out of the oven, they had all run together. This was just fine with me since I tend to go for the inside of the cookie anyway.


I transferred the cookies to a wire rack until they were cool.


When the cookies were cool enough, I spread some fudge on the bottom side of the cookie.


Then I sandwiched the fudge with another cookie.


Mmmm ... just look at that chocolatey goodness!


Add a glass of milk and you're all set!


Honestly, we would have enjoyed these with some ice cream had we not been all out.


Landi Raemi's Ultimate Fudge Stuffed Cookies

1 c. (2 sticks) butter, softened
1 c. brown sugar
1/2 c. sugar
2 eggs
1 t. vanilla
1/2 t. sea salt
1 t. baking soda
1/4 c. dry milk
2 T. cornstarch
2-1/4 c. flour
3/4 c. miniature chocolate chips

For sandwiching:
One 11.75 oz. jar of Smucker's hot fudge topping

Place butter, sugar and eggs in mixing bowl and beat on low to medium speed until well combined. As the mixer is beating, gradually add the remaining ingredients in the order given. When thoroughly mixed, drop by spoonfuls (or use a cookie scoop) onto a cookie sheet.

Bake cookies at 375 degrees for 10-11 minutes. Remove from pan onto wire rack to cool. When cooled, spread the bottom of a cookie with the hot fudge topping and sandwich it with another cookie.

For DQ Fudge Stuffed Cookie Treat:
To replicate the Dairy Queen hot fudge stuffed cookie, heat one sandwiched cookie for 10 seconds in the microwave and serve with a dollop of soft ice cream, then drizzle with hot chocolate syrup or fudge. Enjoy!


Disclosure: The Excalibur Dehydrator link under "Other Sites" is an affiliated link. If you make a purchase using this link ~ you will receive free shipping, along with other specials. I also earn a small percentage to help support my blog. Thank you, your support is appreciated!!