Monday, February 18, 2013

Wall Photo Collage


The one thing I wanted this past Christmas more than anything else, was to have all my children and grandchildren together at the same time. And along with our family altogether, I wanted family photos taken. Luckily I have a sister that is a professional photographer and since she lives a mere three miles away, she agreed to come over on Christmas day.

The plan was to use this photo session for a group wall photo and maybe add a couple group photos, such as one of my husband and me with our five grandchildren.

Imagine the energy it takes to get a four-year-old, a one-year-old, and three 11-month-old babes to smile all at the same time! Of course, our timing probably wasn't ideal, since it was around feeding and nap times, but all-in-all we were very pleased with the results.

For Christmas we received frames and photos from our two married sons and their families. While I know the intention was to use other photos for these frames, I decided to utilize them by adding them to a wall photo collage.

First, I measured the wall where the collage would be placed


Then I proportionately reduced the sizes down so they would be workable in my graphic design program. I was able to Google an image of the "Family" frame for placement and worked around that frame. My sister gave me low resolution photos to play with so that I could size them how I wanted them.

I used a thick border as frames around the other photos. Since I already had the "Family" frame and two twin 6x4s, I had to stick with those sizes. And after playing around a bit, this was what I came up with for the other sizes:


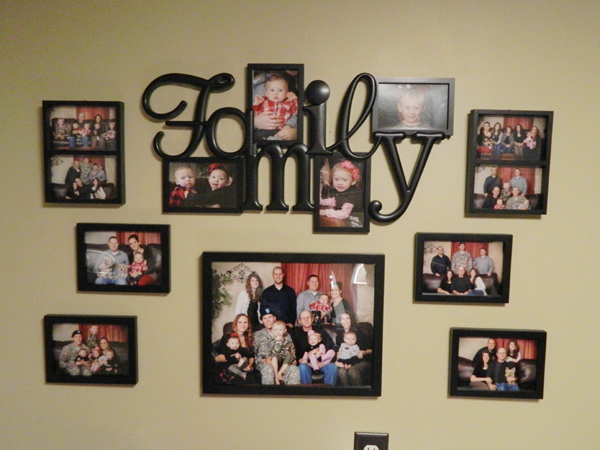
Seeing this arrangement, I finally knew what sizes I wanted to order. The large group photo is 17x11 with four 7x5s to the right and left of it.

Here are the original frames. The top three frames were the gifts and the other five frames were purchased.


Once I had the arrangement figured out I wanted to get the frames hung onto the wall so that I was ready to place the photos inside the frames when my order arrived. I started with the "Family" frame in the center and using screws, I continued to hang the other frames around it.


The next day I was able to pick up my photos after work and placed them into the frames. Here is the finished wall photo collage:


Disclosure: The Excalibur Dehydrator link under "Other Sites" is an affiliated link. If you make a purchase using this link ~ you will receive free shipping, along with other specials. I also earn a small percentage to help support my blog. Thank you, your support is appreciated!!

Saturday, February 16, 2013

No Sew Patched Jeans

Jeans with holes are in style now. I have never owned a pair until recently. My daughter and I each found a pair at American Eagle. Except  for the holes, I fell in love with them. Call me old-fashioned, but I don't see the practicality in putting holes in jeans that are new. However, we both loved the fit and decided to purchase them.

I wore mine once on a cold, wintry day and decided to patch them. Since I didn't want the jeans to look like they were patched, I opted to do a no-sew patch. I searched a local Walmart Supercenter for a bonding material that would work on heavier fabric. I found Heat n Bond Ultrahold sold in packages of one yard. The price was right so what did I have to lose?

I gathered my materials together. Pinking shears, Heat n Bond,


iron, ironing board sleeve,


and an old pair of jeans to cut up for patches.


Here's the jeans with the frayed holes, before patching.


First, turn the jeans inside out.


Next, using a pinking shears, cut two large patches from the old pair of jeans to cover the areas with holes.


Then cut two pieces of Heat n Bond equal in size to the patches. To do this, lay the Heat n Bond on top of the patches.


Once the Heat n Bond and patches are cut, place the Heat n Bond with the film side next to the jeans, making sure to cover the holes.


Iron the bond onto the jeans. (Note: I used my table for taking photos, but I do NOT recommend using it for ironing as the table will become hot from the iron. Use an ironing board.)


Follow the instructions on the Heat n Bond package for iron setting and ironing time.


After ironing, pull the paper off the sticky bonding material.


Make sure to get all the remaining paper off.


Here's how the sticky bond looks close up.


Next lay the patch on top of the bond, right side next to bond.


Press down.


Iron jean patch to sticky bond.


Pull right side out.


Voila! And there you have it!


After patching, I once again wore the jeans. Not sure how this patch holds up to washing, but the package states it is a permanent patch. Time will tell. For now, I'm happy with the results.

Pros: My daughter loves the "frayed" look. The frayed edges should last longer as they are bonded to the patch now. Since the holes are somewhat eliminated with patching, the jeans should also last longer with the patches staying the same size and not getting any bigger.

Cons: Where the patching is, the jeans are stiffer, heavier (for summer wear) and a bit tighter with the extra layer. Below the patch, the jeans seem to sag somewhat.


Disclosure: The Excalibur Dehydrator link under "Other Sites" is an affiliated link. If you make a purchase using this link ~ you will receive free shipping, along with other specials. I also earn a small percentage to help support my blog. Thank you, your support is appreciated!!

My New Bookshelves

Over Christmas vacation my husband helped one of our son's build three bookshelves for his condominium. While doing so, he also made two for me. They decided to replicate the bookshelves from a double-sized bookshelf I received from my mother. My husband and son began the construction of the first shelf until my son had to return home (he lives an hour and a half from home). I was able to help put the second shelf together on a day off, but after that my husband worked diligently by himself until he completed all five bookshelves.

My son and I are so very pleased with the results! My husband did an absolutely fantastic job and the trim work matches the original one very closely. Imagine the before photos of the books I collected at garage sales and thrift shops piled up in boxes in a corner of the basement so very unattractively. My husband was so efficient in cleaning them up while I was gone to work (so no before photos).

Here is the original double-sized bookshelf:


Lo and behold we were able to fit almost all the books from that pile onto the two shelves. Take a look at the after photos of my bookshelves that my husband made. Here is one of them:


Here are both of my bookshelves arranged with a cupboard in between:


Here is a view of the three bookshelves from the right side, looking to the left:


And here is a view of the three bookshelves from the left side, looking to the right. Doesn't that far-off corner look nice and neat:


We delivered my son's three bookshelves to his condominium and helped him set them up and fill them with his DVDs and books. They also looked great!

It is so nice to be able to go to the shelf and find the book I'm looking for instead of searching through several boxes piled on top of one another. Thank you dear hubby!


Disclosure: The Excalibur Dehydrator link under "Other Sites" is an affiliated link. If you make a purchase using this link ~ you will receive free shipping, along with other specials. I also earn a small percentage to help support my blog. Thank you, your support is appreciated!!

My Breakfast Smoothie


Small changes here and there changed a rather unhealthy treat into something that is not only better for me but something I enjoy every morning.

For almost a year now, I have been having a blended breakfast. Originally it consisted of milk, banana, frozen strawberries and frozen yogurt. Because I was trying to eat healthier, I was using frozen yogurt. However, my husband pointed out all the sugar in the frozen yogurt, questioning how that was healthy. I decided to replace the frozen yogurt with chocolate ice cream.

I know ... chocolate ice cream isn't healthy at all, but because we're always thinking cost along with eating healthier, I decided to go with the lesser of two evils. Plus, I love the taste of the chocolate ice cream over the frozen yogurt anyway. Gradually I cut the ice cream down to one small scoop.


During the summer I used fresh strawberries instead of frozen and found the taste rather warm and bland. Just a few frozen strawberries seem to be the perfect amount in this chilled drink.

I use the larger bananas as I love a banana taste. This is a great way to use up those bananas that are becoming overripe.

Along the way, I wondered how to make it even healthier and questioned how a bit of oatmeal would affect the taste? I started out with about a half a cup of the whole oats and absolutely loved it! It makes the texture thicker. I've since upped the amount to about two-thirds cup. Mmmmm ...


Wait, it doesn't stop there ... almond milk is healthier than cow's milk ... Not bad. Not bad at all!


And, cup for cup, almond milk has more nutrition than cow's milk. A great source of calcium.


After enjoying my smoothie this way for awhile, I started reading about "green smoothies" and how extremely beneficial they are for you. What do you think? Should I add a few stalks of celery to my concoction?


Sure enough, I blended it altogether and absolutely loved it! Occasionally, I even add a couple cauliflower flowerets along with the celery.


Always trying to improve on things, I've recently added chia seeds and flaxseed into my smoothie but found that the chia seeds tend to stick to the side of the blender container and the sides of my cup. If I'm not consuming them, there's not much benefit in them for me. Plus they are rather spendy and not easily found in my area.


Now I add them afterward by pouring a little on the top of my smoothie and eat them with a spoon for a little crunch before drinking down the rest.


Of course the taste and texture will vary depending on the size of bananas and strawberries you use, how many celery sticks or cauliflower flowerets you add, and the amount of oatmeal and milk you pour.

What started out as a somewhat unhealthy shake has turned into a much healthier breakfast smoothie that I love!


My Breakfast Smoothie Update:

I did it! I've discovered how to make this breakfast smoothie completely healthy. I was having some issues with my digestion and was not sure if it was from intolerance to the celery or possibly I was becoming lactose-intolerant, or both. I needed to come up with some way to remove them from my smoothie and still enjoy the taste. Eliminating the celery was easy enough, but what about the chocolate ice cream? I have tried this drink without the ice cream and do not care for it at room temperature.

After a lot of consideration, I replaced the chocolate ice cream with chocolate almond milk. For the same consistency, I needed the almond  milk in a frozen state. Problem is, if you freeze almond milk in the carton or a bowl, it would be impossible to scoop it out for single servings. I decided to try freezing the almond milk in an ice cube tray overnight and bag them for quick use. Two cubes per smoothie is the right amount.

A tip to get the cubes out of the tray is to flip the tray upside down and run water on the bottom, then twist the tray back and forth just enough until the frozen cubes drop out.


Turned out I had become lactose-intolerant so I was able to keep adding the celery to my smoothie. Now it's perfect! I actually love the taste even better than before!


Disclosure: The Excalibur Dehydrator link under "Other Sites" is an affiliated link. If you make a purchase using this link ~ you will receive free shipping, along with other specials. I also earn a small percentage to help support my blog. Thank you, your support is appreciated!!

Monday, February 11, 2013

Decorating for Christmas

Decorating for Christmas is always fun when you do it with someone else, right? 2012 was my daughter's last Christmas home before heading off for college. So we decided to go all out with two separate Christmas trees with two different color themes.

A larger Christmas tree that my husband and I had purchased many years ago when our three boys were little was placed in our dining room next to the bay windows. The smaller Christmas tree was a Christmas gift to my daughter from one of her older brothers when she was younger. That year she felt she needed a tree of her very own to decorate. This smaller tree was placed in our living room next to the couch.

Since it's always necessary to clean before putting up the decorations, and because I love the "before and after" to everything, I decided to take photos of the living room and dining room areas to show the improvements. So, here goes ... with a little re-arranging, we ended up with an overall improved appearance in both rooms that we were pleased with.

These three photos are the living room area before cleaning and decorating:


And these three photos are the living room area after cleaning and decorating. Notice how my daughter uses the dog's blanket for the tree skirt:


These four photos are the dining room area before cleaning (clutter always seems to accumulate on this table where my daughter spends hours on her homework) and decorating:


And these four photos are the dining room area after cleaning (take a good look at that table because it won't stay that way for long!) and decorating:


The Christmas tree color theme for the large tree was red and gold with white lights:


The Christmas tree color theme for the small tree was bronze and brown with rainbow lights:


And of course, the reason for the season:


There! Just looking at the after photos make me want to celebrate Christmas all over again! Hope everyone had a wonderful and blessed Christmas with their families.


Disclosure: The Excalibur Dehydrator link under "Other Sites" is an affiliated link. If you make a purchase using this link ~ you will receive free shipping, along with other specials. I also earn a small percentage to help support my blog. Thank you, your support is appreciated!!