

I've been seeing energy bites recipes and they all call for whole oats or ingredients I don't care for, so I decided to come up with my own. I made these twice but the first time I had more craisins in them and too much coconut oil as the oil separated from the rest of the ingredients. This time I think I got it right by adding more oatmeal and putting in less coconut oil.
So, first I gathered all my ingredients.

I measured out the liquid ingredients first and mixed them up thoroughly.

Then I added the nuts and craisins. I would have added more craisins but the bag was empty.


I poured the ground flax and oats into the other ingredients and mixed it together.

I kept mixing until the dry ingredients were all coated.

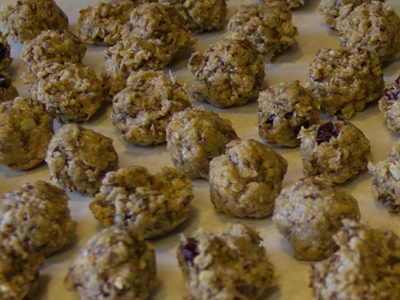
Next I formed the batter into small balls. I started using my fingers but some of the batter was still a bit sticky. I probably needed to mix the batter up more before balling them. Eventually I ended up using a cookie scoop without filling it quite full so they were smaller in size. I placed them on wax paper when I was finished.
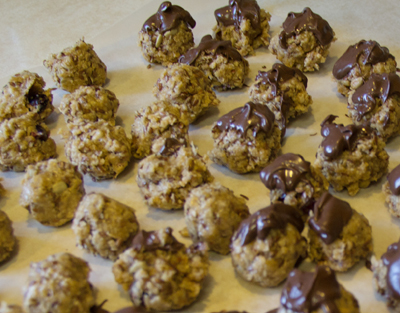
I had a couple squares of chocolate bark left from another baking project so decided to melt that up and put it on top of some of the energy bites.
I'll be the first to admit that I'm not very talented when it comes to coating with chocolate bark. So although they aren't the prettiest, the taste is great!
Landi Raemi's Energy Bites
Ingredients:
1 c. peanut butter
1 t. vanilla
1/4 c. coconut oil
1/2 c. honey
1 T. craisins
1/4 c. sunflower seed nuts
2 T. wheat germ
3 c. oatmeal, measured first, then ground
1/2 c. flaxseed, measured first, then ground
Optional: Chocolate bark
Directions:
Measure out liquid ingredients and place in bowl. Mix thoroughly. Add craisins, nuts and wheat germ. Mix thoroughly. Measure out oatmeal and flaxseed and place in food processor. Grind into flour. Pour the flour mixture into the batter and mix thoroughly. Form into small balls.
Optional:
Melt chocolate bark and coat energy balls. Place on wax paper to dry. Enjoy!
Update:
Because of the extreme warm weather we had been having, I put these in the refrigerator so that they would set up better. My husband and one of my sons tried them and absolutely loved them! I commented that my original plan was to coat the entire ball with chocolate bark and my husband begged me not to change a thing! He insisted that they were perfect with just a little bit of the chocolate bark drizzled over the top. He felt if I coated the entire ball it would be too much chocolate. Then he added that I should finish adding chocolate to the ones without any chocolate coating.
The Bites Gone Bar!
I know, I know, the husband didn't want me to change anything on this recipe. But I'm constantly looking for ways to improve things by saving time or money. In this case, it was time!
So what I did was place the finished batter into a pan. Since I ran out of the chocolate bark, and since I love milk chocolate even better, I frosted these energy bars with 1/2 cup of milk chocolate chips and 1/4 cup of peanut butter melted in a double boiler. Turned out even better ... I can't get enough of these!

Once again, another revision of this recipe. Since I'm trying to eliminate as much gluten in my diet where I'm able to, and since wheat germ contains gluten, I've eliminated it completely. And, because I never have any Craisins in the house, I also replaced them with more of the sunflower nuts. You can still add the Craisins if you so choose, just remember to reduce the amount of sunflower nuts.
Another thing I changed was to leave my flaxseed whole. I tend to like the taste and crunch of them just the way they are. However, I reduced the amount as too many didn't seem to adhere to the finished bar. And last of all, I decided to make it mandatory to leave the chocolate frosting on these bars.


My revised recipe:
Landi Raemi's Energy Bars
Ingredients:
1 c. peanut butter
1 t. vanilla
1/4 c. coconut oil
1/2 c. honey
1/4 c. + 2 T. sunflower nuts
1/4 c. flaxseed
3 c. oatmeal, measured first, then ground
Directions:
Measure out liquid ingredients and place in bowl. Mix thoroughly. Measure out oatmeal and place in food processor. Grind into flour. Place in separate bowl. Add sunflower nuts and flaxseed to oatmeal flour and mix together. Combine the flour mixture with the liquid mixture and mix thoroughly. Spread in bottom of pan. I use my 7.5"x10.5" Rock 'n Serve Tupperware pan which is the perfect size.
Frosting:
Ingredients:
1/4 c. peanut butter
1/2 c. milk chocolate chips
Directions:
Melt peanut butter along with the milk chocolate chips in a double boiler. Spread on bars.
Disclosure: The Excalibur Dehydrator link under "Other Sites" is an affiliated link. If you make a purchase using this link ~ you will receive free shipping, along with other specials. I also earn a small percentage to help support my blog. Thank you, your support is appreciated!!


