Sunday, June 28, 2015

Foiled Potatoes


These potatoes were inspired by my daughter-in-law Lynn, who is a fantastic cook! While visiting some time back, my son Brandon and his wife grilled some meat and potatoes on the grill. The food was all amazing!


I decided to come up with a version of those potatoes for the oven since my husband doesn't have much time for grilling. The results were just as amazing! A guaranteed hit!

Normally I use dried herbs and store-bought onions, but since the onions and parsley are already up in the garden, we used those instead.

Recipe below.

Foiled Potatoes

Several potatoes, peeled and sliced, enough to make two layers on a large plate
One medium-sized onion or a few green onions, chopped in small pieces, halved
1/4 cup of butter, halved
Parsley, sea salt and pepper, to taste

Place the first layer of potatoes on a microwaveable plate, and microwave on high for up to 4 minutes, depending on how thick your layer is. (This starts cooking the potatoes, especially helpful when grilling.) While potatoes are cooking, take a large piece of foil (enough to fold over the top) and spray with cooking spray. Place one half of the foil into a baking pan and put the potatoes on top. Top the potatoes with slices of half of the butter, onion and parsley. Sprinkle with salt and pepper. Add another layer of potatoes and the remaining toppings.

For oven: Bake at 350 degrees for one hour.
For grill: Grill for half hour or until potatoes are tender.


Disclosure: The Excalibur Dehydrator link under "Other Sites" is an affiliated link. If you make a purchase using this link ~ you will receive free shipping, along with other specials. I also earn a small percentage to help support my blog. Thank you, your support is appreciated!!

Saturday, June 27, 2015

Kombucha, Part II


Today when I got home from work, I pulled my Kombucha out of it's hiding spot to see how it turned out. It looked great and had a nice second SCOBY forming. I pulled them both out of the jar and put them in a bowl along with some of the fermented tea.


Next I poured the tea into four 1-1/2 pint-sized jars, leaving about 1 to 1-1/2" from the top. Since I didn't plan ahead and really didn't know what to put in for flavors, I sliced up an apple and put several into three jars. I added 1/2 teaspoon of cinnamon and 1/4 teaspoon of ground cloves to two of the jars, and added frozen blackberries to one of the jars of apples. In the fourth jar I put blackberries only.

I was really just winging it at this point. I just hoped they wouldn't turn out too vinegary tasting from adding the apples. I'll update this post once I find out.


The directions said to put covers on and let sit for a week, burping them occasionally.

I wasn't quite sure where to put them after having a conversation with my sister Laura. She had also started making her own Kombucha; however, she said she put her jars right out in the open light on top of the refrigerator. Not sure which way is best so I am experimenting with two in the cupboard, and two out on the shelf.


After taking care of the flavoring, I split the SCOBYs and made two more batches. One with black tea, and one with green tea. For directions, go to my post, Kombucha.


I may have to invest in another gallon canning jar or two after all, I'll need one for my SCOBY hotel!


Oops, I nearly forgot! I tasted the tea and it was pretty good; however, it had a yeasty smell to it, more than likely from the fermenting. After all, SCOBY stands for Symbiotic Culture of Bacteria and Yeast!

I tried to get my husband to try it and he absolutely refused. Next I worked on my son. I really had to push him into it, because he didn't like the smell of it. I really thought he would like it since he occasionally likes to drink my tea, but he didn't. I haven't tried my daughter yet, but I'm pretty certain I'd have to hog tie her down and force it down her throat. So I guess it's all mine!

UPDATE: The apple-flavored tea did have a slight vinegary taste to them, similar to apple cider vinegar I suppose, only not nearly as strong. The cinnamon and cloves definitely helped with the flavor. While I didn't mind the taste, I'm not especially excited about it. I think I'll keep trying other flavors.

For more on the Kombucha making, go to Kombucha and Kombucha, Part III.


Disclosure: The Excalibur Dehydrator link under "Other Sites" is an affiliated link. If you make a purchase using this link ~ you will receive free shipping, along with other specials. I also earn a small percentage to help support my blog. Thank you, your support is appreciated!!

Friday, June 26, 2015

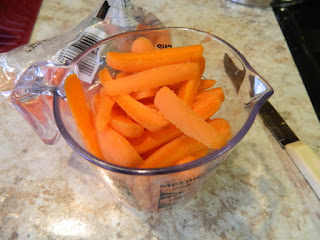
Carmelized Carrots


Mmmm ... Carmelized Carrots! I would never have guessed these would taste so delicious! My sister, Nancy came up with these and allowed me to sample them. I was blown away! The next day when she came out to visit, I talked her into making them again. We had no problem finishing them off!

I decided to give these little fries a name. Lately my husband's favorite descriptive word for food is "carmelized," pertaining to anything with a crispy, carmeled edge. So that is how I came up with the name Carmelized Carrots.

Nancy just added a bunch of carrots with a little water and kept adding more coconut oil to the batch, as needed. Since it is hard to know how much of each ingredient to put in for the first time, I measured them out to get an idea.

First put 1/4 cup of water and two tablespoons of coconut oil in a small saucepan on low heat. Next quarter the baby carrots lengthwise to look like small fries.


Put the fries into the saucepan and stir them up a bit to distribute the oil and water onto the carrots. Turn the heat up and put the cover on. Continue to cook the carrots until tender and/or until the edges are brown. I left them in for about 1/2 hour while I prepared my lunch for work.

The carmelized carrots were my breakfast!


Carmelized Carrots

2 c. baby carrots, quartered lengthwise
2 T. coconut oil
1/4 c. water

Place all ingredients in a small saucepan. Cover and cook on medium heat until tender and/or the edges are browned, about 1/2 hour.


Disclosure: The Excalibur Dehydrator link under "Other Sites" is an affiliated link. If you make a purchase using this link ~ you will receive free shipping, along with other specials. I also earn a small percentage to help support my blog. Thank you, your support is appreciated!!


Sunday, June 21, 2015

Kombucha


Here's my first batch of Kombucha tea! I have to say that I have been very excited about making my own ever since my sister Nancy had given me a taste of her store-bought Kombucha.

I found a website and ordered a Scoby. The site I chose is called Kombucha Kamp. I ordered it on Tuesday before going to bed, and the next day I drove to a local Runnings store to purchase a gallon canning jar. The Scoby arrived by priority mail on Saturday. I'm not sure why, but I was totally excited!


I read over the instructions carefully and decided to get to work on my first batch! Here is the Scoby with a bag of included tea for the first batch.


The directions said to boil 4 cups of water, cool 1-2 minutes, then add to the brewing vessel. Next steep the tea for 5-10 minutes.


Remove the tea bag, add 1 cup of sugar and stir until dissolved. I used a bamboo spoon since the Scoby is not to come in contact with any metal.

When the sugar is dissolved, add another 8 cups of water.


Add the entire contents of the Scoby bag with starter liquid to the brewing vessel.


Cover container with a tightly woven cloth and rubber band. Place in a dark, warm area for 7-12 days. Here it is in the cupboard, all safe and sound.


Can't wait until next weekend to see how it turns out! Happy Kombucha-ing!!

For more on Kombucha making, go to Kombucha, Part II and Kombucha, Part III.


Disclosure: The Excalibur Dehydrator link under "Other Sites" is an affiliated link. If you make a purchase using this link ~ you will receive free shipping, along with other specials. I also earn a small percentage to help support my blog. Thank you, your support is appreciated!!